
Documents, PDFs, QR Codes & iFrames
Documents, PDFs, QR Codes & iFrames
Virtual Front Desk lets you do almost everything a receptionist would do behind a counter. You can show visitors a PDF, a QR code or a web page (iFrame) from a button on the station, include them in a visitor sign-in form, or send them to the station screen during a live video call. PDFs can also be signed by visitors or sent to a printer.
Everything starts in the Content library, in the main menu on the left. The Content library has four tabs:
- Documents: PDF files.
- QR codes: links that visitors scan with their phone.
- Iframes: web pages, online forms and web applications displayed on the station.
- AI context: information used by the AI receptionist. To learn more, read the AI Agent Setup Guide.
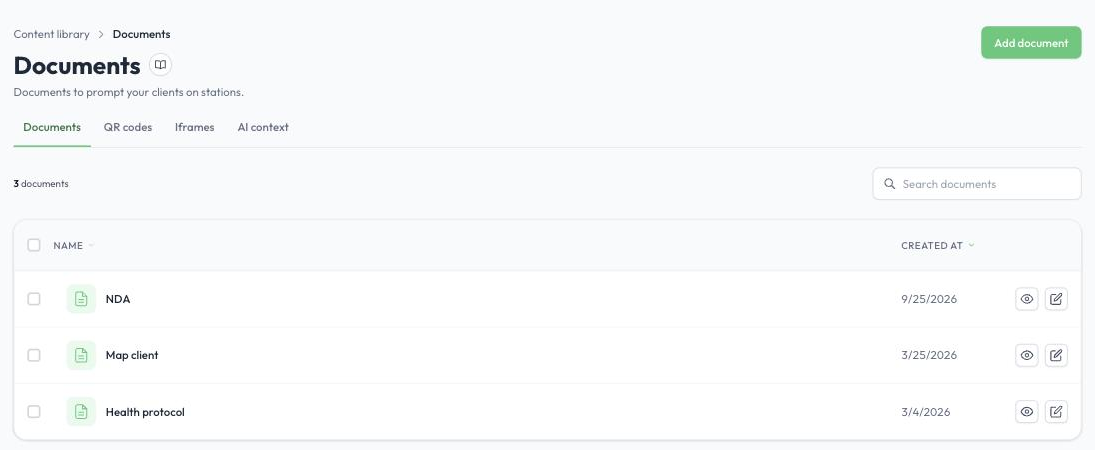
The Content library, Documents tab
Documents (PDFs)
Add a document
- In the main menu, click Content library, then open the Documents tab.
- Click Add document.
- Enter a Document name and upload your PDF file.
- Click Add document.
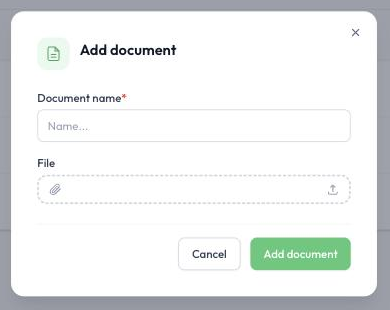
Adding a document
Use the eye icon to preview a document and the pencil icon to edit it.
Where you can use a document
- On a station button: set the button action to PDF so visitors can open the document from the welcome screen.
- In a visitor sign-in form: visitors review the PDF and, if required, sign it. See Displaying a document or an iFrame in a sign-in form below.
- During a live video call: display the PDF on the station screen, have the visitor add their name, email and signature, or send it to a printer connected to the station.
Tip: A simple way to let visitors keep a copy of a PDF is to create a QR code that links to it. Visitors scan the code and download the document on their own device.
QR codes
Add a QR code
- In the Content library, open the QR codes tab.
- Click Add QR code.
- Enter a QR code name and the QR code URL. The full address, including https://, is required.
- Click Add QR code.
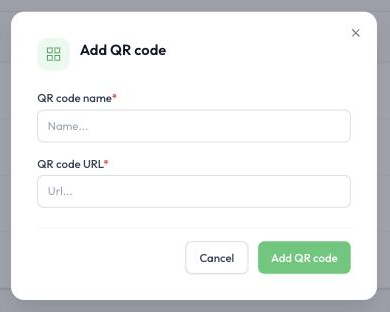
Adding a QR code
Where you can use a QR code
- On a station button: set the button action to QR code and select one of your QR codes. Visitors press the button to display the code and scan it with their phone.
- Permanently on the welcome screen: open the station, go to Settings > Advanced settings and turn on QR code on welcome page.
- During a live video call: send a QR code to the station screen instantly by entering a full URL. To learn more, read Live Call Features.
iFrames (web pages, online forms and web applications)
An iFrame displays a web page inside the Virtual Front Desk station. You can use it for online fillable forms (such as Jotform or Microsoft Forms), websites, maps, or web applications such as Google Calendar.
Important: no redirections allowed. iFrames do not support redirections. If the embedded page tries to send the visitor to a different address, the iFrame will not load. Any website, form or web application displayed in an iFrame must stay within the same domain.
In addition, some websites and applications do not allow themselves to be embedded in an iFrame. If an iFrame does not load, this restriction is the most likely cause.
Add an iFrame
- In the Content library, open the Iframes tab.
- Click Add iframe.
- Enter an Iframe name and the Iframe URL, including https://.
- Click Add iframe.
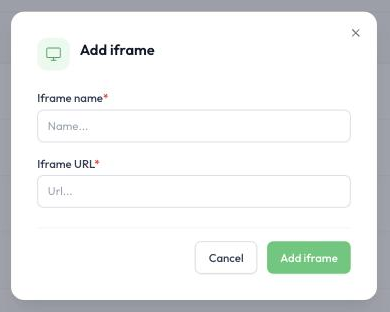
Adding an iFrame
Display an iFrame from a button
- In the main menu, click Stations, open the station, and go to the Buttons tab.
- Click Add button, or click the pencil icon to edit an existing button.
- Under Button action, select iFrame.
- Under Option details, open Select iFrame and select one or several iFrames. When you select more than one, visitors see a submenu listing each of them.
- Click Save changes.
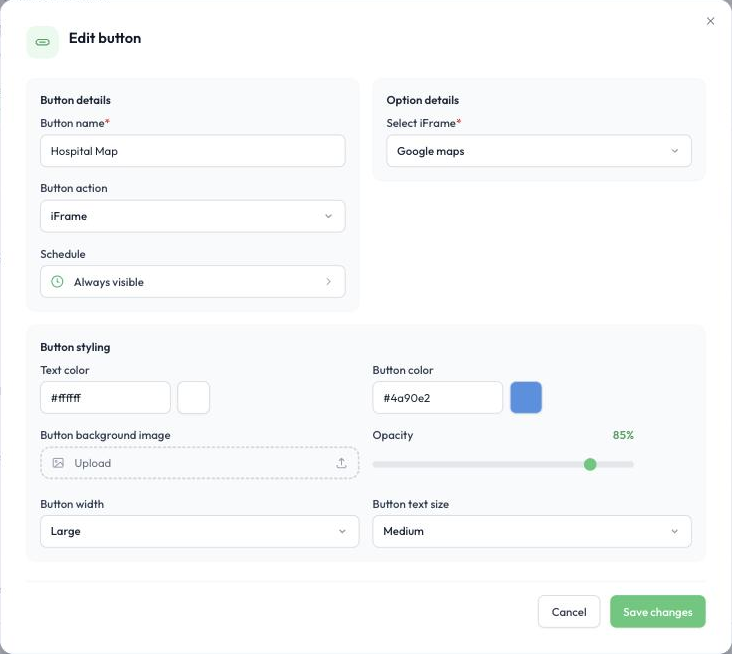
Setting iFrame as a button action
The same Button action list also includes PDF and QR code, which work the same way with the documents and QR codes in your Content library.
Split the station screen with an iFrame
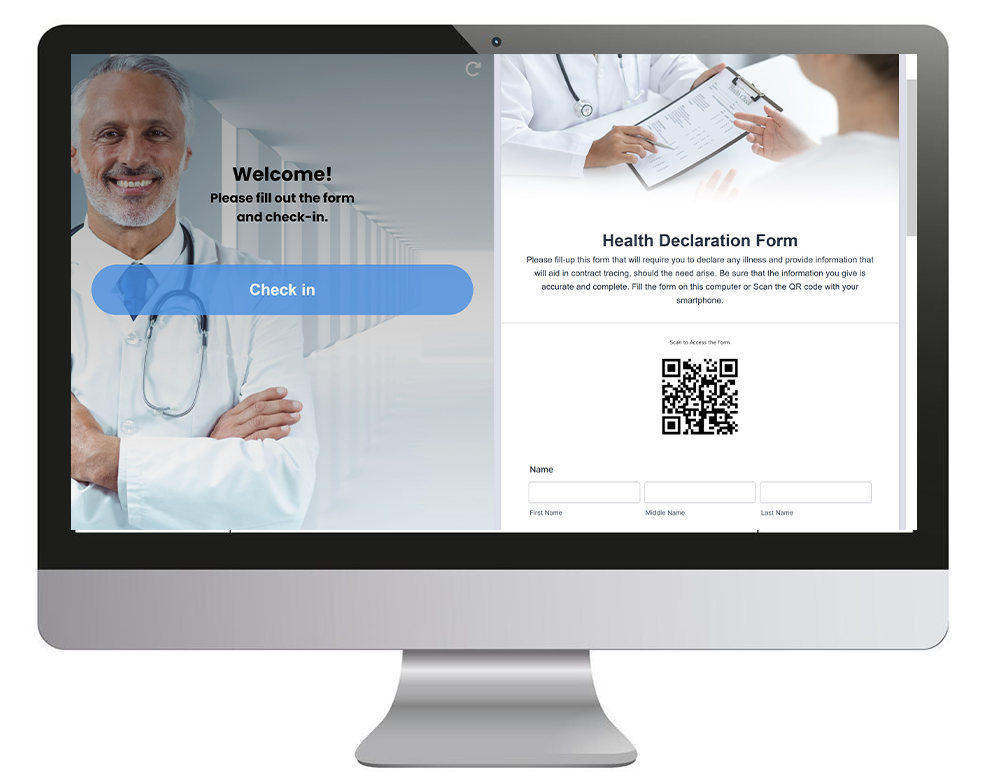
You can display a web page permanently beside the call buttons on the station’s welcome screen.
- Open the station and go to the Settings tab.
- Under Advanced settings, turn on Split your screen with an iFrame or Video.
- Enter the full URL of the page you want to display.
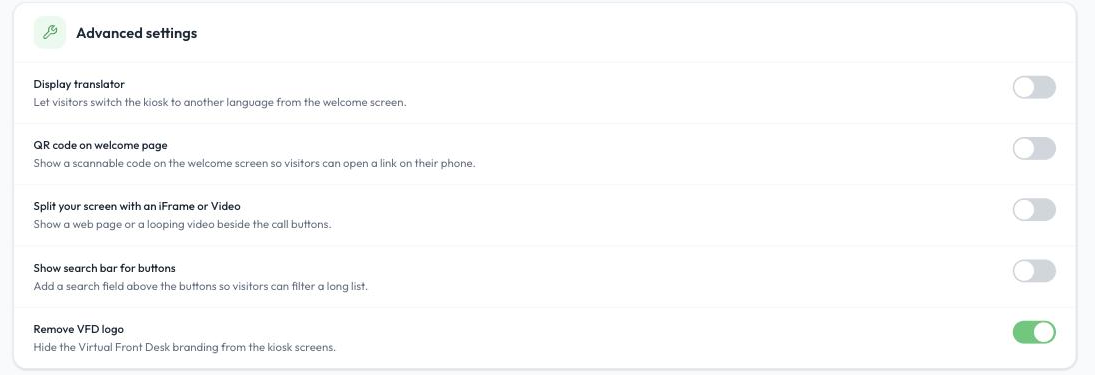
Station advanced settings
The welcome screen is split in two, so you may need to adjust your station’s buttons, logo, background and welcome message to fit the smaller area. The same option can display a looping video instead of a web page. To learn more, read Customization, logo and background images & videos.
Displaying a document or an iFrame in a sign-in form
A visitor sign-in form can include a PDF to review and sign, or an iFrame when you need a more complex form than the built-in fields allow.
- In the main menu, click Visitor sign-in and open your form with the pencil icon.
- Go to the Sign-in form tab.
- Turn on Documents / iFrame.
- Under Choose content type, select one of the following:
- Document (PDF): choose a document from your Content library, or click Upload document. Turn on Requires signature if visitors must sign it.
- Custom content (iframe): select the web page or form to display.
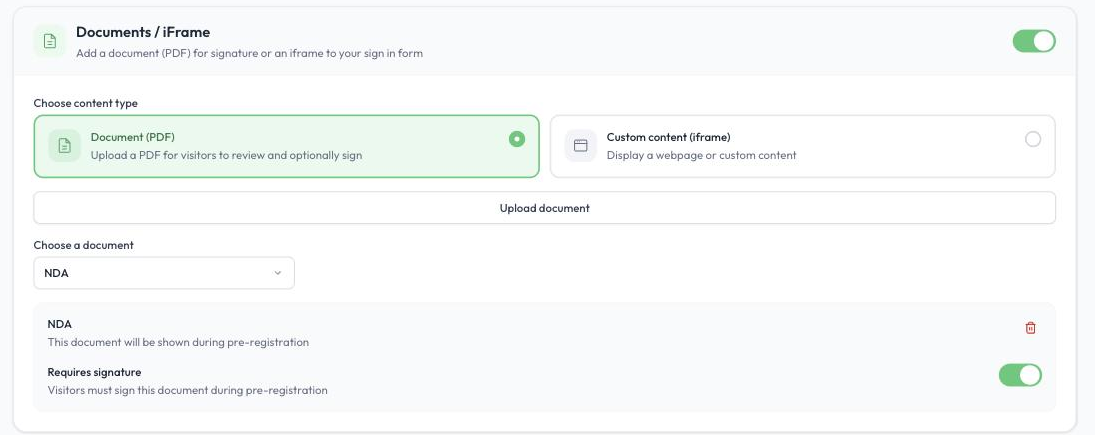
The Documents / iFrame section of a sign-in form
To learn more, read Visitor sign in form and sign out option.
Sending content during a live video call
During a live video call, the document tools at the bottom of the call window let you:
- Display a PDF from your Content library on the station screen, and have the visitor sign it.
- Upload a PDF from your computer and send it straight to the station screen, without adding it to the Content library first.
- Send a PDF to a printer connected to the station.
- Send a QR code to the station screen by entering a full URL.
- Display an iFrame from your Content library on the station screen.
iFrames must be added to the Content library before you can send them during a call. PDFs can come from the Content library or be uploaded during the call, and QR codes can be entered directly. To learn more, read Live Call Features and Printing badges and documents.